Infrastructure Setup
This repository holds configuration files in order to set up the cloud environment on AWS.

You may find the dedicated components’ repository at the listed locations:
How to setup
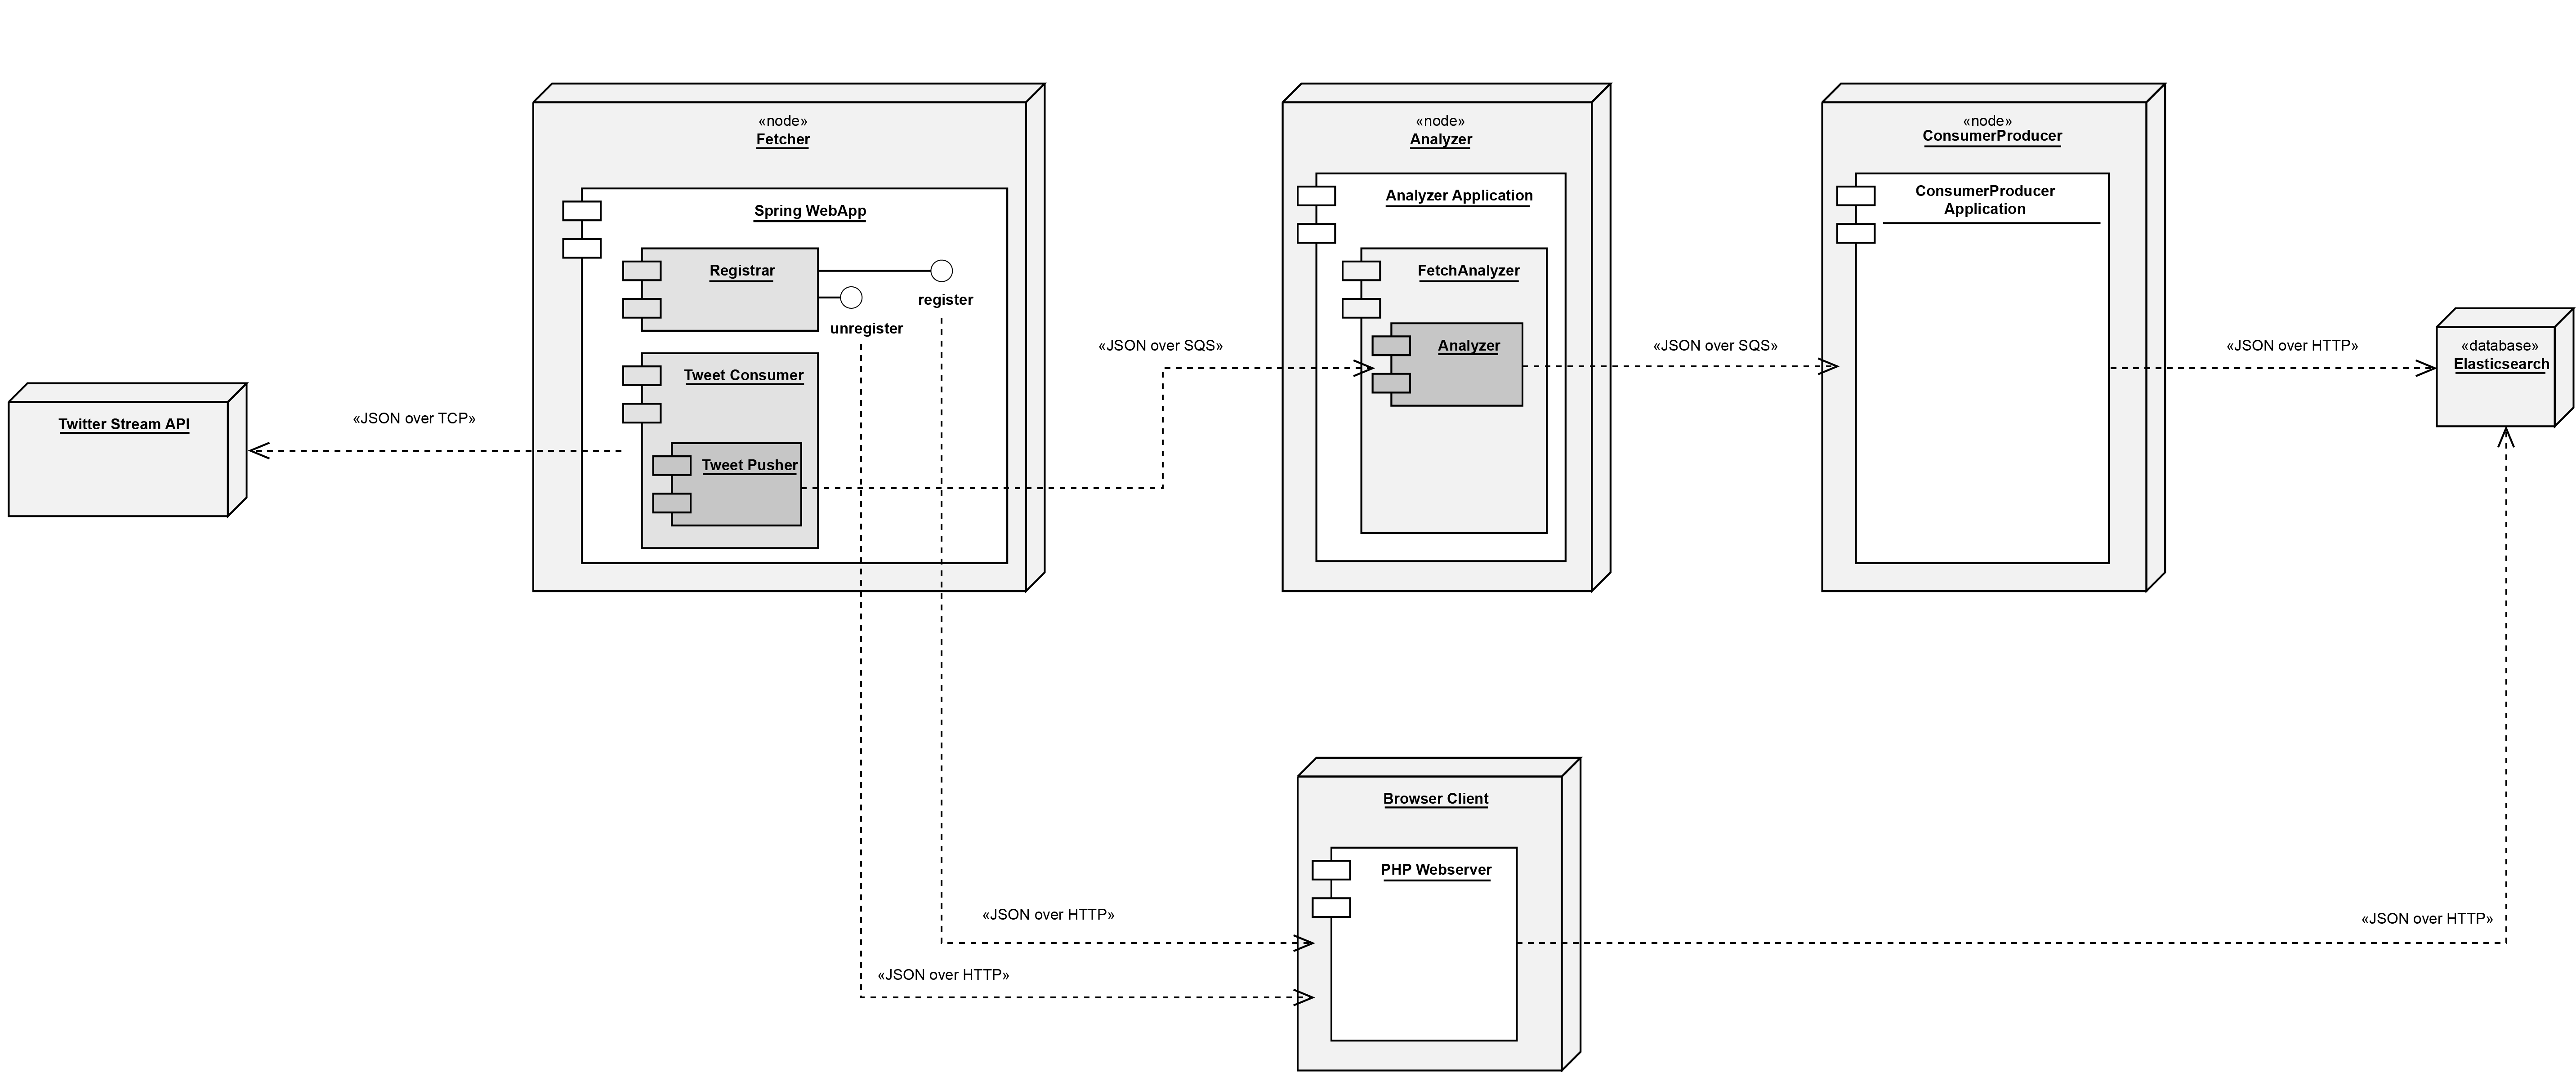
The infrastructure will look like the following:
Please note, that the following setup steps have only been tested on Mac OS. Additionally, be prepared, that our setup script uses the default security group and subnets to set up instances.
Prerequisites
An IAM role with admin access is needed to run the setup scripts. Please create a role with these permissions and note the corresponding AWS access key and the secret key for that role. Further a SSH connection private key-pair is required during the setup of the EC2 instances. Please create one, as described on the AWS documentation
In order to run the setup script, the ASW CLI is required. Please install it according to the AWS documentation.
Once ASW CLI is installed it has to be configured using the following command in the terminal: aws configure.
Please provide the AWS access key and secret key when promted.
Please also choose us-west-2 as the region, and leave the last prompt empty.
The setup script starts instances that are based on a public AMI created by us. The AMI is based on the Amazon Linux AMI 2017.03.0. It it was extended by installing the docker deamon on the machine, and also pull the latest docker containers for the project, to reduce the startup times of the instances. To use a different AMI one has to change the ImageId and the SnapshotIdin the LaunchConfigurationsAnalyzer.json and LaunchConfigurationsESProducer.json file.
Make also sure, that you have Docker installed in order to run the Fetcher application as well as the web interface from your local machine. See the steps below to get you started.
Furthermore, to be able to access Twitters Stream API, make sure, you have created an App on https://apps.twitter.com/. Note all, the Consumer Key and Secret as well as the Access Token and Secret, for later usage.
Setting up the backend:
- Set up elastic search by running the script
Setup_ElasticSearch.sh. Setting up elastic search can take up to 15 min. Note, that the setup can only continue once Elasticsearch has been correctly setup. - Check the status of elastic search at https://us-west-2.console.aws.amazon.com/es/home?region=us-west-2 or run the following command in the terminal:
aws es describe-elasticsearch-domain --domain-name "tweetanalyzer" --query "DomainStatus.Endpoint". If the resopnse is notnullElasticsearch is ready. - Open the
setup-ec2.shfile with any text editor and fill in the three lines at the top with your credentials and the name of the ssh key:AWS_ACCESS_KEY_ID="FILLOUT" AWS_SECRET_ACCESS_KEY="FILLOUT" sshKeyName="FILLOUT" - Save the changes and close the file.
- You might need to change the permission of both the
setup-ec2.shand the ssh.pemfile in order to run the script:chmod +x /path/to/yourscript.sh chmod 400 /path/to/yourkey.pem - You can now run the
setup-ec2.shwith:./setup-ec2.sh - If no errors are displayed the backend is setup and running
Setting up the fetcher and the webinterface:
Due to the limited scalability abilities of a single Twitter API key reasons, we did not deploy the Fetcher application on AWS. Realtime streaming of tweets can be a hard things to do. Additionally, also the frontend application is not deployed on AWS since scaling this in the current scenario is not required. However, for both components, docker containers are created and deployed on docker hub. Please see the dedicated repositories for more information.
Fetcher
The fetcher component retrieves tweets to a particular term and publishes them to a AWS SQS-Queue.
Follow the steps below to get you started:
- Run
docker pull tweetsentimentanalysis/fetcher:latestto get the latest image from Dockerhub - To launch the container, use the command below, but adjust the credentials for Twitter and AWS (this command assumes that the SQS queue where tweets are pushed, is called
fetched-tweets. You may change this by also specifying the env variable-e SQS_QUEUE_NAME='').:
docker run -p 8090:8080 -e AWS_ACCESS_KEY_ID='...' -e AWS_SECRET_ACCESS_KEY='...' -e TWITTER_CONSUMER_KEY='...' -e TWITTER_CONSUMER_SECRET='...' -e TWITTER_TOKEN='...' -e TWITTER_TOKEN_SECRET='...' tweetsentimentanalysis/fetcher:latest
- The fetcher application is now running on your docker VM (e.g. http://192.168.99.100:8090)
Webinterface
Running the webinterface is quite similar:
- Run
docker pull tweetsentimentanalysis/webinterface:latestto get the latest image from Dockerhub - To launch the container, use the following command, but adjust the credentials as well as the URL to Elasticsearch accordingly and the fetcher (aka.
REGISTRAR_URL):
docker run -p 9000:8080 -e REGISTRAR_URL='192.168.99.100:8090' -e ELASTICSEARCH_URL='https://...' -e AWS_ACCESS_KEY_ID="..." -e AWS_ACCESS_KEY_SECRET="..." tweetsentimentanalysis/webinterface:latest
- Eventually, the webinterface is now accessible at http://192.168.99.100:9000.
Assumptions
Please note, that the command assumes, that Elasticsearch is accessible over HTTPS, if not, please adjust the env variable accordingly to use http://. Furthermore, to show you statistics of each running instance on AWS EC2, the region is assumed to be -e AWS_EC2_REGION='us-west-2'. Also, to get metrics of the SQS queues, they are assumed to be named -e AWS_FETCHED_TWEETS_SQS_QUEUE_NAME='fetched-tweets' resp. -e AWS_ANALYZED_TWEETS_SQS_QUEUE_NAME='analyised-tweets'. You should not have to change any of these variables, if you set up the infrastructure using the deployment scripts above.
Setting up the Load Generator
In order to simulate load on the infrastructure, the TweetProducer application fetches all currently stored tweets from Elasticsearch and republishes them without the sentiment value and a different id again to the first queue.
Use the following steps, in order to test load on our infrastructure:
- Pull the docker image:
docker pull tweetsentimentanalysis/tweet-producer:latest. - Use the command below to start the load producer. Again, adjust the URL to Elasticsearch as well as the AWS credentials accordingly.
docker run -e ES_HOST='https://...' -e AWS_ACCESS_KEY_ID="..." -e AWS_SECRET_ACCESS_KEY="..." tweetsentimentanalysis/tweet-producer:latest
- Watch the queue getting filled up and the instances launched.
- Note, that scaling out may take some time, since the Autoscaling Policy is fetching metrics only each minute.
Clean up when finished:
- Remove all instances and autoscaling groups with:
./CleanUp.sh - Shut down elastic search with:
./ElasticSearchCleanUp.sh